Tuesday, May 31, 2011

Race Cars and Tutus

10 days ago my kiddos turned three-years-old.  And the fact that I'm just now getting a chance to post pictures of the party is just evidence to the reality that life has a way of happening to me sometimes.  But I suppose just making the effort is better than just throwing in the towel... as my mom used to say, 'better late than never.' 
We were privileged with some special guests that really helped to make the party extra exciting.   Nonnie and Poppie as well as their Aunt Jessica and cousin Daisy drove from Tennessee just for the special day.   Many a birthday has been spent crowded around my parent's large round table, and this particular day wasn't any different.  Aunt Jo (Joy), Mo Mo (Molly), Collin, Me Me, Pops ('Pots'), Jon, and I were of course a part of the fan fare as well.  All in all, it was a fairly laid back day with lots of family time, just the way we Booths like it!


Daisy or "Baby Daisy" as the kids call her.  
Jessica and Daniel's almost 6-month-old little girl


Playing in the big sand box


Jessica and Daisy

We spent the first half of the day at Stone Mountain Park.  Driving through those familiar gates was like strolling casually to the past.  Memories of days gone by itched at my subconscious, like smelling something that sends you back in time.  It was neat to retrace some old steps.  There is so much to do there, but we opted to spend time playing on the playground and strolling in the woods.

Eli and Hannah on the hike


"A three year old child is a being who gets almost as much fun out of a fifty-six dollar set of swings as it does out of finding a small green worm."


I found this quote and it really struck a chord with me.  Regardless of all the effort I put up to make their party special, i.e. delightful food, fun games, bang-up decorations, my kids are just as content and happy to be playing in the sand box.  The simplicity of their desires and the ease with which they happily embrace life where they are is teaching me great lessons.  I love this about my children.


The themes for our party were Princesses and Race Cars. 


Hannah in her birthday hat
 ...she was actually happy.  Seriously, she was.  


Ballerina Princess Cupcakes
Almond pound cake cupcake 
with white chocolate, strawberry cream cheese icing.


Race Car Cupcakes 
Red velvet (in honor of Lighting McQueen) cupcakes 
with cookies and cream cheese icing


My attempt to make a model race track... on a budget. 
I know it's border line 2nd grade work, or maybe even kindergarden.  
But I love my boy, and I'll even test my artistically challenged side to make him happy.


Fun parties can be very exhausting!

Saturday, May 28, 2011

The Gentle Intrusion


It has officially been three weeks since the bees arrived.  They have been quietly going about their business, and I have enjoyed many moments sitting and watching them.  To stand at a distance and observe them going to and from the hive is pretty neat.  I have been trying to catch sight of them in their pursuit of nectar, but once they have launched from the hive their tiny specimens are lost amid the backdrop green.  In other words, I have no idea where they are collecting from, and I'm beginning to realize that I may never be able to actually track them down.  I guess this will come with more time and observation.


A Look into their Crowded work Life 

It's interesting, the bees seemed completely uninterested in the intense amount of sugar and water mixture that I set out for them.  In fact, the jar was mostly full up until about six days ago.  Then all of a sudden they drained a one quart mason jar in a day.  Go figure?  What I've decided is that they can be unpredictable.  It really shouldn't come as a surprise to me since every bee keeper I've spoken with has differing opinions about what works with the bees.  And lots of the information I've read has conveyed the obvious truth that bees cannot be tamed, they are wild in their own rite and they must do whatever their particular hive needs in order to survive.

A first look

The first time opening the hive was intimidating.  Being a total novice, I felt like a blank book whose pages needed to be written with the proper instructions on what to do.  Jon and I went together, taking turns holding the smoker tool and working with the hive.  Our main objective was to check on the outermost frames to see if the bees had begun to build comb on the extremities of their hive body.  


Hive body with Frame "2" Removed. 

What we discovered in the process was that our bees still had frames 1 and 2 as well as 9 and 10 to begin building their intricate combs upon.  As you'll notice, the foundation within the frame did not contain any comb whatsoever.  Now, in the event that the bees had begun building comb on frames 2 and 9, our next step would have been to switch 2 and 9 to the outermost spaces (essentially switching them into 1 and 10's spot - sorry, if this sounds confusing).  We made a small mistake.  Although the bees had not built on any of these four exterior frames, we switched them any way.  This wasn't necessary.  It's only effective to switch the frames if in fact comb is being built, and since there wasn't the presence of comb yet it wasn't helpful to switch them.   


Jon holding an exterior frame devoid of comb


Propolis

Another goal in opening the hive was to remove propolis.  Propolis (as seen above) is a resinous substance that is thick and waxy which the bees use to build their comb.  Within these waxy hexagonal figures the queen lays eggs to build her brood, and they are also used to store the golden goodness we call honey.  As a bee keeper, you want the bees to build within the frames and not along the top of the frames or out of the top of the hive body itself.  So, this beautifully built extension of propolis that you see in the photo above had to be gently scraped away.


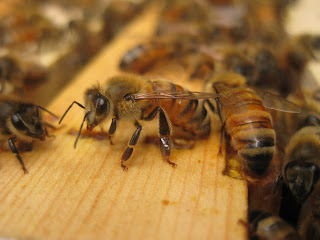
Building Comb


Opening the hive was awesome!  It was unbelievable to encounter all the thousands upon thousands of bees.   And to say that I wasn't nervous would be a lie, I was definitely nervous.  But I was also mesmerized by the beauty of it all.  Thankfully, neither Jon nor I were stung.  Actually, the bees didn't even seem to mind our presence much at all.  In truth, I can probably attribute their laid back behavior to the endless puffing from the smoker tool!  But the most essential tool (if I may call it that) of this experience, this intrusion of their home was gentleness.  


Sunday, May 15, 2011

Welcome Home


Ahh, yes the long awaited post about the bees.  I'm so sorry I didn't get to this last week, but my life has been on the edge of crazy for the last five days (more like the last five years, but who's counting).  Two sick kiddos, a working and in school husband = long days and nights with little rest.  This means that the things I love doing often get neglected, like blogging for instance.  And speaking of busy, wow!  I think I will learn a lesson or two from these amazing bees who I have the privilege of keeping on my property.  These ladies are beyond busy, they are highly motived and I've NEVER seen a group made up of mostly females who get so much done with so little drama.   
So as a recap, we picked up the bees a week ago.  On the night we picked them up from the local bee keeper, I laid my ear against the closed hive and I could hear the humming of thousands upon thousands of bees.  The thrill of their energy and of the journey that I was getting ready to embark upon gave me such a kick of joy.  It was awesome.  They survived the 1 hour drive back home and we set them up on cinder blocks (two high) and removed the wire mesh which was placed over the entrance, gating them all in for the ride.  Amazingly, not one bee came out once the mesh was removed. 

The next morning I ventured out in the morning to see the action.  Sure enough, there they were awake and on their way diligently doing their job.  The pattern and rhythms of bees, like so many wild creatures is based upon the sun light.  When the sun is up, so are they. 


The Ground Work

Below I'm going to detail the necessary preparations that had to be done in order to welcome this army of working women.

SUGAR, SUGAR, SUGAR


Something that I didn't realize when I first started my research on bee keeping is the unbelievable amount of sugar that is required in the process.  I honestly believed that bees could find their own food without any help at all.  And this is true, obviously because wild bees seem to do just fine.  But in order to keep your bees around, feeding them a solid mixture of sugar and water is a must.

The recipe for sugar water is pretty simple, however like with most simple concepts we have muddled it enough to make it seem a little complicated.  Most of the books will explain that the sugar to water ratio is 1:1 and they would be correct.  BUT it is not a 1:1 based upon quantity, but upon WEIGHT.  So, for a gallon of water which is approximately 8lbs one must add 8lbs of sugar.  That is a lot of sugar, so go to Costco and bulk up on your sugar rations.  An easy recipe is as follows:
1 Five Pound Bag Sugar
2.5 Quarts of Warm Water
Dissolve the sugar into the warm water, do not boil!!
I made up quite a bit and have a back-up quart ready to go when I need it.


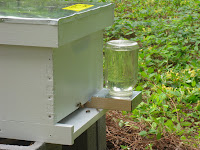
My Sugar Storage.  On the right you'll see the entry feeder.  This contraption slides up under the entryway and the bees can feed directly from the drippy syrup dispensed through the dotted holes on the lid of the mason jar.


TEST YOUR EQUIPMENT

Yep, you heard me right.  Get out there and light your smoker, try on your hat, put on your veil, and work a little with your gloves.  I used a couple different fuels for the smoker.  First, I used pine needles.  These created a beautiful and thick white smoke and quickly, but I could tell that I would have to keep adding more needles as they burned fairly quickly.  I also used Pet Bedding, which I found fairly cheaply at Lowes in their dog house section of the store - and it's a huge bag, so it'll last forever probably.  The finely shaved pieces of cedar were a little more difficult to start the smoker with, but once I was able to get the heat going the smoke was white, thick, cool, and best of all long lasting.


BUILD YOUR SUPER
Being the novice bee keeper that I am, I was unaware of how soon I would need my super.  Turns out my assumptions were pretty badly off.  Now, as to the exact time we will add the honey super that depends 100% on the bees themselves, each hive has its own personality.  But when I learned that it could be a week to three weeks, we got busy building.   My husband is a carpenter and LOVES to do wood working. So, when I mentioned that we needed to put this together, his eyes lit up.  There are plenty of places to find plans to build your own super, but for the sake of time and sanity we opted to buy the materials already measured out.  He spent about an hour putting it together (and that was with the "help" of our two-year-olds).  I highly recommend you start with a kit and learn to put these together, you'll save money and you'll have a greater investment of yourself in this hive.  We opted for the Shallow version of the super, the comb itself is about 4 3/4 inches deep.  You can go with a medium or deep super, however be prepared to put your back into lifting!  When filled with honey, the frames can be quite heavy.


Piecing the box together


One of the 10 frames for our Shallow Super


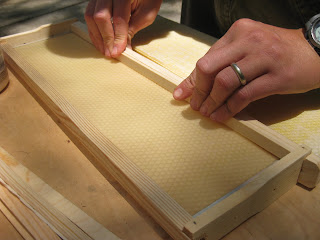
Duragilt Foundation going inside each frame.  
These are thin sheets of embossed, bees wax coated foundation. The scent of the bees wax gives the bees an incentive to start building, they feel right at home.


Securing the foundation into the frame.


The Work Piling Up


The Beginning 


The Middle


The End


With everything in place and ready to be used, the only real action we can take is to wait - and believe me, waiting is an action!  So we gave the bees about five days to settle into their new location before we opened the hive.  I'll be posting the results of our first opening soon!


Monday, May 9, 2011

Weekly Menu


RECAP

Last week's menu went just fine.  Yes! I'm thankful for another successful week.  I know that this seems so simple, but planning, shopping, and actually following through with cooking the meal is for whatever reason challenging at times.  Okay, enough with that.  On to the recap.  Last week my favorite meal by far was the stir-fry.  In times past, I have never been able to make a truly delicious stir-fry.  I've decided that there is an art to the ability to cook the veggies smothering them in delicate asian flavor without over cooking it.  But this time I nailed it!  The veggies were not over cooked, it was great!  Unfortunately, I don't have a picture - of course!  But believe me, bite size chicken pieces served alongside broccoli, cauliflower, long green beans, sliced carrots, and thin sliced purple onion on a bed of brown rice... yum, enough said! 


THIS WEEK'S MENU

Monday - Baked chicken with veggies

Tuesday - Quiche

Wednesday - Easy meal (Probably Fish Sticks)

Thursday- Baked Penne Pasta (I'm trying a new recipe, I'll let you know how it turns out.)

Friday - Crock Pot Pork Loin

Saturday - Left Overs 

Tuesday, May 3, 2011

Biscuits and Bacon, "Just Like Mama (Mammy) Makes"


I wonder how many people in my generation could walk into their kitchen at any given time and whip out the necessary ingredients to make a mean biscuit? I would wager a guess that there probably aren't too many.  And I'm sure that most of my health conscious friends would probably frown upon the idea of feeding their children white flour, buttermilk, and lard, baked up with a pat of butter (essentially more lard).  But let's be honest here, who doesn't like a good southern style hot, crispy on the top, steamy and soft in the middle biscuit hot out of the oven?  Go ahead and pass... I dare you!

Well, last week I told my mom, the token biscuit maker for my side family, that I need a tutorial.  I fully intend to pass on this tradition, healthy or not and give my children the chance to participate in a tradition that my great-grandmother, grandmother, and mother have worked to sustain.  And for those who may think it's a simple thing, biscuit making requires lots of determination, suave,  patience, and whole lot of southern spirit.  It truly is in its own way a form of art.  These fluffy works of art certainly have a deeply rooted history, sustaining multitudes of people throughout time.  These days they are considered more as an option, however in days past the biscuit used to be a staple in the diet.  Girls were taught the basics of baking with their mothers as the worked through the daily routine of making biscuits.

In these modern times, the biscuit has evolved into something that can still be tasty, but in my opinion has moved from it's genuine roots.  Pretty much any fast food place will serve something on a what they deem to be a biscuit, but I bet the great-grandmothers from days gone by would shake their heads and laugh - those are not the same.


So, here was my attempt to follow along side my mom with a goal of learning the 'family secret,' which is really no secret at all... it's just plain 'ol southern goodness.


 The dynamic trio: Crisco, Buttermilk, and White Lily Self-rising Flour
 (the only brand my mom will use)


 It's hard pill to swallow, but yes, true biscuits are made with lard.  
But this is essential and not too long ago bacon grease was the lard of choice.


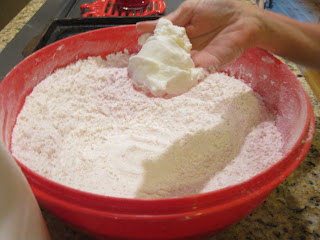
 Gloveless?  You better believe it, making good biscuits has a great deal to do with touch.  In this case, my mom showed me how important it was to understand 
the feel of the flour once the crisco was pinched (by hand) into the flour.


 Once the flour and crisco have been worked sufficiently, it's time to pour in that necessary item.  And don't try to mimic Buttermilk.  The morning of this biscuit making lesson we were out and I suggested making a substitute for the butter milk and my mom would not have it.  
Substitutes won't cut it, it has to be the real thing.   


 More mixing. 
 For those more squeamish about getting their hands dirty, this is not for you.  
Time to begin working in more flour into the dough.


 Eli and Hannah also had their own side lesson


 What kid doesn't enjoy playing in bread dough? 


 Still gently working the flour into the dough, 
pulling it from the edges in swirling, stirring motions.


 Done and ready to go onto the greased pan.


 Pulling off a section of dough, rolling it, and tucking the edges under.


 The Line Up
Mammy likes to have them snuggled up close together on that pan.  Pre-heat your oven to 450 degrees and pop them in for 8 minutes - it doesn't take long.


Hannah working her dough


 DONE


So, you may wonder what the big deal is with this recipe.  Throughout my years growing up this was a breakfast that my mom would make on occasion.  It is now the most requested meal whenever my siblings and their families come to visit.   I know my mom takes such delight in making this treat, and I believe that in some way it allows her to stay connected with her own mom.  I can imagine that with every batch there is laced throughout memories untold, moments that can only be explained through the smell and feel of worked dough and hot baked goodness. Like a machine meant to take us back in time, I can only guess that her biscuits are a link to the past.  I know that without a doubt they are a link to my past and a certain part of my future.

Hungry Yet?